Wednesday, March 18, 2009

Dual-Booting Guide for Boot-132 Retail Leopard & Win XP.

Dual-Booting Guide for Boot-132 Retail Leopard & Win XP.

leopard-x861-300x1921

First of all, Hats OFF to the whole OSx86 Community especially to DFE , Stickpin , Llauqsd. I’m just here to helping you with a clean documentation.If you are not interested in Dual boot & want’s to install OSX Leopard Retail Standalone then follow this guide Click HERE.

.

1] Make backup of your Hard Drive result’s may vary with hardware to hardware.

2] Download the image of USB-Boot-132 Loader here

3] If you’ve followed the guide by stickpin, proceed to step 5. If not, borrow a computer with OSx86 or a real Apple one to modify the INITRD.IMG according to the needs of your motherboard & other devices. Just drag/drop any necessary kext(s).

4] Now open Disk Utility and restore the “BOOT132USB” to your USB-Flash Drive (at least 256MB capacity). Make sure you check the “Erase destination” option.

5] Follow this guide by llauqsd to prepare a self-booting (Retail) Leopard DVD Installer (boot-132 + retail leopard dvd installer into 1). But more importantly, the guide provides for installation in MBR partitions. Don’t worry, the installer is still vanilla coz you’re just “telling” it to recognize MBR partitions.

6] Now that you have your USB-Boot-132 Loader & a (Retail) Leopard DVD Installer for MBR partitions, let’s get the installation started.

7] Boot your (target) computer with your (Retail) Leopard DVD (MBR) Installer.

8] After the “Choose Installation Language”, open Disk Utility. Make three (3) partitions. 1st partition for your WinXP, 2nd partition for your Boot-132 (size should be a little bigger than the capacity of your USB-Boot-132 Loader), then 3rd partition for your Leopard. Make sure they’re MBR partitions. 1st & 2nd partitions should be MS-DOS (FAT) and 3rd partition Mac OS Extended (Journaled).

9] Reboot and replace Leopard installer with Win XP installer. We’ll have to install WinXP first. When you’re happy with your Win XP, let’s install Leopard.

10] Now let’s boot with your (Retail) Leopard DVD (MBR) Installer again. Then open Disk Utility again.

11] Plug-in your USB-Boot-132 Loader and restore it to the 2nd partition. Make sure you check the “Erase destination” option. When done, exit Disk Utility.

12] Proceed with the Leopard installation.

13] After successful installation, open Terminal application before your computer automatically restarts.

14] We now have to make the 2nd partition (your Boot-132 Loader) active. Enter the following in Terminal:

diskutil list (lists your computers Hard Disk(s) and corresponding partition(s): take note of the Hard Disk where you have the partitions for the Boot-132 and your newly installed Leopard)

fdisk -e /dev/rdisk0 (where 0 is the appropriate disk identifier)

f 2 (where 2 is the correct partition number for your Boot-132)

write

y

exit

15] Quit Terminal and reboot.

16] At reboot, make sure you remove the Leopard installer from the optical drive and if everything goes well, you’d have the options of either booting Win XP or Leopard.

Install Mac Leopard OS X Retail DVD on a Ordinary PC with Boot 132 hack.


leopard-x861

THNX to David Eliott master behind the Boot 132 hack which allows us to Install OSX on P.C. with the Unmodified retail version of mac OSX Leopard. The main benifit of Retail install over modified distro install is with retail install you can update your system directly from apple software updater just like an original Mac Machine.So forget about iAtkos, kalyway, Leo4all etc. & move with retail Install.
.
Requirement’s
  • A PC with Intel Core Processors and Chipset (AMD is not supported).
  • A retail Mac OS X DVD Installer Download Click here or Buy Click here.
  • Download the Chameleon for Hard Disk here.
  • Download the Boot-132 Generic ISO here.
  • If don’t works than download the more modified version.
  • Download Boot-132 ISO with modified kexts here.
  • Before we starts let’s see how it works >>> you burn an Boot-132 Generic ISO (which has the bootloader on it) to a CD/DVD, after it gets to the boot prompt, you press ESC or ENTER and it prompts for a new BOOT DEVICE, you swap the BOOT CD/DVD with the LEO Retail DVD, you press enter and it shows you the name of the bootable partition from the DVD, you press enter and Leo starts to load. Some people pays money to E-FIX for this free & simple trick.The guide is divided into two phase’s first one is for Installing the OSX & second one is to elimnate the need of BootCD evry time while booting.Ready with your poison let’s start.
    First of All burn Boot-132 Generic ISO into a C.D. in following tutorial term Boot-132 Generic ISO is replaced with BootCD.

    Phase One >>>

    1. Insert your BootCD into DVD/ROM and boot/start your PC.

    2. On the boot prompt, press Enter. You will be asked to enter a two-digit hexadecimal boot device (do not press any key).

    3. Remove the BootCD and replace it with the Mac OS X Retail DVD. Wait for the blinking light on your DVD drive to stop and then hit Enter (this will read your DVD drive and not your HD).

    4. Perform the Mac OS X Leopard installation. You may need to use Disk Utility (under the Utilities Menu) to partition and format your HD if you haven’t already. Make sure to select GUID (under Options).

    5. Restart after the installation and replace the Retail Mac OS X DVD with the BootCD.

    6. On the boot prompt, press Enter. This time, enter the two-digit hexadecimal of the drive where you installed OS X. Enter 80; if it doesn’t show the startup volume of your OS X, hit Esc. Try 81, and so on until you see your OS X volume. Select it and hit Enter.

    Now are in Leopard but you still won’t be able to boot your hackintosh without the BootCD. For overcome the BootCD you need to install external bootloader.

    Phase two >>>

    1. Open Chameleon that you download’s early.

    2. Copy the contents of the Extra directory from the Generic.iso CD by drag & drop in to the Extra Contents folder in Chameleon by following this simple procedure .

    Open the Generic.iso CD from your desktop. >>> Double-click on the INITRD.IMG file. >>> Double-click on the Extra folder. >>> Drag the Extensions folder to the Extra Contents folder in Chameleon

    3. Double-click the Chameleon_DFE_for_Hard_Disk.pkg file and install to your hard disk.

    4. Remove the BootCD and reboot.

    5. You should now be able to boot into Leopard without the BootCD.


    Saturday, February 7, 2009

    Mac OS X | How to Convert a DMG to ISO Using Terminal


    These are instructions on how to convert a DMG image file to an ISO image file using Mac OS X Terminal. You may want to do this if you need to burn a DMG image using a Windows or Linux operating system.

    Step One
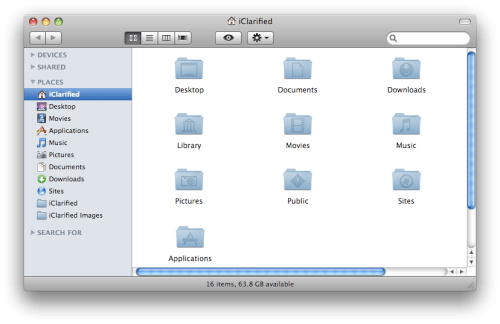
    Place the DMG you would like to convert on your desktop then open a new Finder window by clicking its icon in the dock.


    Step Two
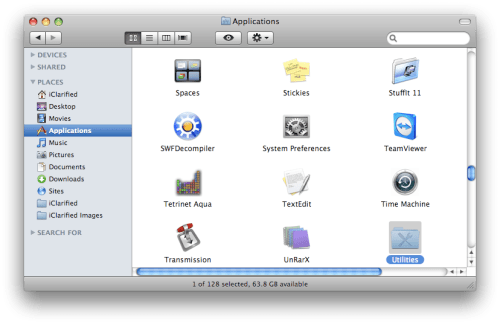
    Click to select Applications from the list of Places on the left.


    Step Three
    Double click to open the Utilities folder from list of Applications.


    Step Four
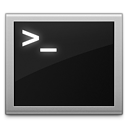
    Double click to launch Terminal from the list of Utilities.


    Step Five
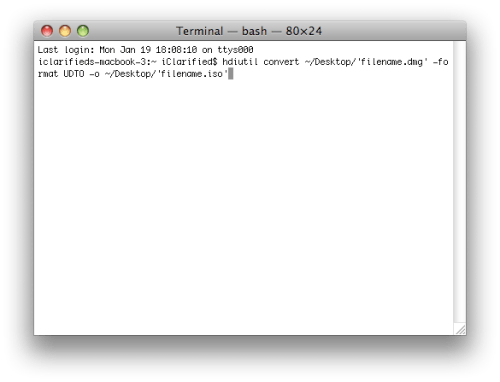
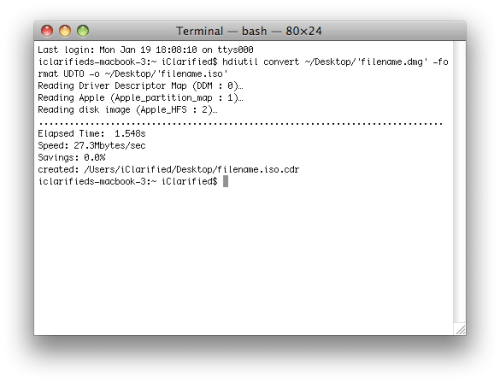
    Enter the following command into the Terminal window.
    hdiutil convert ~/Desktop/'filename.dmg' -format UDTO -o ~/Desktop/'filename.iso'


    NOTE*: Remember to replace 'filename' with the name of your DMG image.

    Step Six
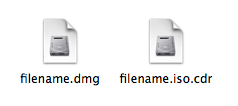
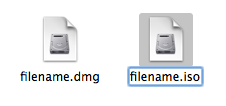
    You will now notice a new file appear on your desktop with a .iso.cdr extension. Select the file and hit the Enter key to rename it removing the .cdr extension.


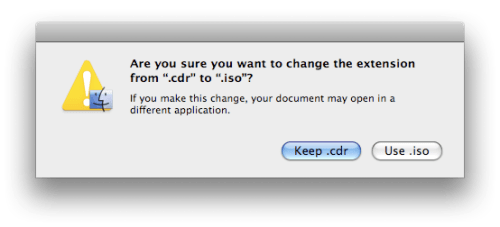
    You may be asked to confirm this. Click to select Use .iso.


    Step Seven
    You can now copy this to any Windows or Linux computer for burning.

    Thursday, November 6, 2008

    Download QuickPwn 2.1 and Pwnage Tool 2.1 NOW!

    Download QuickPwn 2.1 and Pwnage Tool 2.1 NOW!


    Whoa, folks. Just one day after iPhone firmware 2.1 was released, the Dev Team has released a jailbreak already! Do these guys ever…sleep? LOL! Anyways, today they announced the released of QuickPwn 2.1 and Pwnage Tool 2.1 for Mac! Let’s find out some more details, shall we?

    By the way we figured out a way to combat iTunes 8 without patches…and we’re waiting to see what Apple tries next. But we think they might want to rethink their priorities. They probably won’t though, and so we get back to the “cat and mouse” game between Apple and the Dev Team and third-party communities.Here are the new versions of PwnageTool and QuickPwn that support the 2.1 firmware. And as we just mentioned, iTunes was not harmed in the process ;-) no patching was required.

    This does not address the new iPod Touch 2G device released this week. Partly because none of us even have one yet :)

    * PwnageTool 2.1 for Mac OS X via Bittorent - download here
    * QuickPwn 1.1 for Mac OS X via Bittorrent - download here

    The above download links are via BitTorrent, and I would suggest downloading it that way to ensure you get the official packages.

    The Dev Team also stated that there are spammer sites out there trying to make money of their hard work. It’s best to avoid these fakers and stick only to the news you find at the Dev Team Blog.

    For an excellent guide, check out the recently released guide by iClarified. Let me know how your jailbreak goes folks! Remember, right now the QuickPwn and Pwnage Tool is for Mac users only! Let the cat and mouse game continue–yet again!!

    Top Sources List for Cydia and Installer 4

    Top Sources List for Cydia and Installer 4

    So of course after the jailbreak, two of the most important applications are Cydia and Installer 4. Cydia has emerged as the source for apps and themes to customize your iPhone. Installer 4 is still in its beta stage so expect a bit more from it coming soon.

    Here are a list of my sources for Cydia (some are by default):
    - BigBoss & Planet-iPhone: http://apt.bigboss.us.com/repofiles/cydia/
    - ModMyiFone: http://modmyifone.com/repo/
    - Ste Packaging: http://repo.smxy.org/cydia/apt/
    - iSpazio: http://ispaziorepo.com/cydia/apt
    - Telesphoreo Tangelo: http://apt.saurik.com/
    - ZodTTD: http://www.zodttd.com/repo/cydia/

    Other notables:
    - intelliborn: http://intelliborn.com/cydia
    - FreeCoder: http://iphone.freecoder.org/apt/
    - Hack&Dev.org: http://iphone.hackndev.org/apt/
    - SaladSoft: http://nickplee.com/cydiasource/
    - Urbanfanatics.com: http://urbanfanatics.com/cydia/
    - iPhoneCake: http://cake.mapleidea.com/cydia/
    - WeiPhone: http://app.weiphone.com/cydia/
    - iFoneTec: http://app.ifonetec.com/cydia/
    - iSpazio: http://ispaziorepo.com/cydia/apt
    - Andy Dam: http://repo.gafoogle.com/
    - Steffwiz: http://steffwiz.webs.com/iPhone/Repo

    To add sources: Launch Cydia—>Manage—>Sources—>Edit—>Add—>enter the URL—>click Add Source

    Here are the sources for Installer 4 so far:
    - RiP Dev - http://i.ripdev.com/
    - BigBoss’s Apps and Things. - http://apptapp.thebigboss.org/repofiles/installer4/
    - iSpazio Official - http://repo.neolinus.org/ispazio/
    - Ste Packaging - http://repo.smxy.org/installer4/
    - ClubiFone - http://www.clubifone.com/repo/
    - iPhone-notes.de - http://sendowski.de/iphone/
    - a27 Dev Team: http://a27dev.com/installer/repo/
    - Hackmyiphone: http://hackmyiphone.net/installer/
    - Wildcat: http://iphone.handheld.com.vn/installer
    - iClarified: http://installer.iClarified.com
    - Modmyifone: http://i.modmyifone.com/

    To add sources: Launch Installer 4—>Sources—>Edit—>click the “+”—>type in source URL—>click Done

    Big thanks to the MacRumors forums and iPodTouchFans forums for helping with compiling this! I haven’t tested all of these sources so be wise about it! :) If you have some sources that I did not list, feel free to add them in the comments.

    Wednesday, November 5, 2008

    How to: Newbie’s Guide to WinPwn 2.0(.1) Jailbreak


    How to: Newbie’s Guide to WinPwn 2.0(.1) Jailbreak

    Author: Andrew Robinowitz | Posted under: How-Tos
    Tags: , , ,

    UPDATE (8/09)

    New WinPwn now available (2.0.0.4). Will successfully ‘pwn’ iPhone firmware 2.0.1. Firmware links in Step #2 now download iPhone 2.0.1 version.

    Download it HERE or HERE.

    UPDATE (7/25 12:45 PM)

    New WinPwn now available (2.0.0.3)

    From the WinPwn page:
    “2.0.0.3 fixes the Ipwner crash problem and 16xx errors. It will also fix the iPod ipswBuilder failure bug.”

    Download it HERE or HERE.

    UPDATE (7/24 1:25 AM)

    Step 12 has changed. Make sure to UNCHECK the “Activate Phone” option (it is selected by default) if you have a carrier-specific iPhone that has already been activated. After you restore with the custom IPSW, your iPhone (connected to your PC with iTunes open) will automatically Activate correctly. Otherwise, you will have no carrier information and no signal (** see screenshots at bottom of post).

    Thanks to everyone in the comments for their help in resolving this!

    Here’s our step-by-step comprehensive guide to jailbreaking your iPhone using Windows, with WinPwn 2.0 (Mac users check our How to: Newbie’s Guide to iPhone 3G Jailbreak, which is a Mac only jailbreaking tool).

    This wasn’t quite as easy and intuitive as the PwnageTool 2.0 jailbreak for Mac, so make sure to closely follow the outlined tutorial and proceed with caution and at your own risk!

    For reference, we used a 1st generation iPhone, WinPwn v2.0.0.2 (use v2.0.0.3 or latest available), and went for just the jailbreak (not unlock). Make sure you have iTunes 7.7 installed and have your iPhone plugged into your PC.

    First off, some starting notes from the WinPwn site:

  • You MUST do a full uninstall of winpwn before installing the new version
  • Make sure you have the latest version of iTunes ( Currently 7.7)
  • WinPwn uses 300MB of ram at peak due to the ipsw being extracted in memory
  • You must first click browse and load an IPSW to use WinPwn (i thought this was clear)
  • For 2.0 only the *5A347_Restore.ipsw files are valid. The 345 image will not work
  • If you see Failed to load image catalog/payload catalog, this is fine and won’t cause problems
  • If you already have service with AT&T do not activate or install Youtube Fix
  • 1. Download WinPwn (latest version) - Currently WinPwn 2.0.0.2 2.0.0.3, 2.0.0.4 (for Apple’s 2.0.1 Firmware) but check WinPwn Site for updates.

    2. Download .ipsw for your iPhone, save to desktop:

    • for 1st generation download (UPDATED: 2.0.1 firmware link) HERE
    • for 3G download (UPDATED: 2.0.1 firmware link) HERE


    3. Run WinPwn .exe and install.


    4. Close readme which automatically opens.


    5. Finish install.


    6. Open WinPwn.


    7. Click ‘Browse .ipsw’ and select .ipsw file downloaded in step 2.


    8. Click ‘IPSW Builder’.


    9. 1st tab, Applications:

    • Cydia - you probably want this if you’re jailbreaking, since you’ll need it to install apps, so check it.
    • YouTube Activation Fix - from the WinPwn Site: “If you already have service with AT&T do not activate or install Youtube Fix,” so I left this unchecked.


    10. 2nd tab, Custom Images:

    Here you can set custom images for your Boot/Loading (default: Apple) and Restore (default: dock-connect) screens. You can browse your computer for images, and also the online catalog (unless the terminal displayed “Failed to Load Image Catalog” when WinPwn started up).

    Not clicking anything will set you up with the default Apple/dock-connect screens, which is what we opted for…


    11. 3rd tab, Custom Payload:

    Most likely you should leave this blank (which we did). In summary, you can add other applications to your install process so you’ll have them on your iPhone right when the jailbreaking process is complete. For instance, if you checked Cydia install in the first tab, you’ve already created a custom payload that will have Cydia waiting on your Springboard upon jailbreak.

    You can browse your computer for them (.tar files) or get them from the online catalog (unless the terminal displayed “Failed to Load Payload Catalog” when WinPwn started up).


    12. 4th tab, Advanced:

    For this section, just leave ‘Activate Phone’ checked (which is default).

    Uncheck ‘Activate Phone’ and continue to next step if you have a carrier-specific iPhone that has already been activated — failure to do this will result in a loss of carrier information and no signal (** see screenshots at bottom of post). Your iPhone will automatically activate itself in iTunes upon completion of the restore.

    Unless you are trying to unlock (which we’re not in this tutorial), you don’t need to worry about bootneuter, baseband updates, or bootloaders.


    13. Click ‘Build .ipsw’ in the bottom left.


    14. Click ‘OK’ once you receive the ‘Successfully Created IPSW File’ message.


    15. Now click ‘Ipwner’ button in WinPwn and browse/select the custom IPSW you just created. Click ‘OK’ after receiving the ‘Your Itunes has been Pwned!’

    NOTE: If you have tried the WinPwn process and received the 06, 1600, 1601, or 1602 error messages, you probably skipped this step (as we learned the hard way after an hour of frustration).

    16. You’re ready to set iPhone into DFU Mode.

    To do this, hold down the ‘power’ and ‘home’ buttons at the same time for ten seconds (turning your iPhone off), and then immediately release the ‘power’ button and continue to hold the ‘home’ button for another ten seconds. Your iTunes should recognize your device and your iPhone screen should be ALL BLACK. If you see the docking screen, you have hit the actual ‘Recovery Mode’ and need to repeat the process until you get the blank ALL BLACK iPhone screen.


    17. iTunes should automatically load and now you must Shift-Restore (hold the ‘Shift’ key on your keyboard while clicking the ‘Restore’ button in iTunes) and select the custom IPSW you just created.


    18. Wait for the restore to take place and complete, wait for iPhone to activate automatically, note Cydia & App Store on your Springboard, and rejoice… congratulations, you’re iPhone has now been pwned!

    ** Here you see a successful activation (by unchecking “Activate Phone” under the Advanced tab, step 12)…note the upper-left corner with carrier information & bars.


    ** Here you see an unsuccessful activation by leaving the “Activate Phone” option checked. Note the upper-left corner with 1 bar (alternates with ‘no service’) and lacking carrier information.


    How to Use Cydia: A Walkthrough


    How to Use Cydia: A Walkthrough

    Author: Nic Elder | Posted under: How-Tos
    Tags: , , , , ,

    If you have used Installer.app in the past, Cydia should look somewhat familiar and be fairly straightforward to use.

    Here’s a basic walkthrough to help you navigate through and get the most out of Cydia.

    NOTE: This only works on jailbroken phones, see our 3G Jailkbreak Tutorials for Mac Users & Windows Users.

    1. Click the spiffy new Cydia icon on your Springboard

    You’ll see loading while it updates the sources and loads the welcome screen.

    2. Upgrade Cydia

    From here if you haven’t run Cydia in a while, or this is your first time running, you may get a notice about ‘Essential upgrades’. These are upgrades to the Cydia application itself that may be required for installing new packages and apps:

    • Press Upgrade Essential
    • Press Confirm to begin the download and install
    • Wait for Complete and press Close Window
    • Press the home key, and then re-open Cydia to continue

    NOTE: After installing essential upgrades, it’s always a good idea to restart Cydia to make sure the new packages are reloaded. Repeat Step 1 to open Cydia again (though you probably already guessed that).

    3. Update Applications

    If you’ve installed applications previously you may see a numbered notification next to the “Changes” menu. This indicates that there are updates available for currently installed applications. For our walkthrough I’ll update the NES emulator I downloaded a couple of days ago.

    To update applications:

    • Press Changes
    • Press Upgrade All (#) [top right of screen]
    • Press Confirm to begin download and installation

    You’ll notice on the last shot that NES has disappeared from the list and the notification
    (red 1) on the changes option has been removed.

    NOTE: Changes also contains applications that have recently been added or changed, this is a good place to go to find new applications on a regular basis.

    4. Installing New Applications

    Let’s install something new. I love Pac-Man, and it just so happens that the developer of Mac-Man, a great Pac-Man clone, is available on Cydia under the games category.

    To install an application:

    • Press Install [on the bottom]
    • Browse through categories to Games
    • Press Macman
    • Press Install on top right
    • Press Confirm to begin the download and installation

    You will see it run through a series of steps . . . Downloading . . . Preparing . . . Complete.

    • Press Close Window

    Now Macman is successfully installed, you should be able to hit your home key, wait for your homescreen to refresh, and a tempting new Macman icon will be waiting for you.

    Let’s go eat some ghosts!

    5. Removing or Reinstalling Applications

    Ok, so now you have an application installed, but you don’t really want to play it anymore. Removing it is as simple as a few taps:

    • Open Cydia again
    • Press Manage
    • Scroll and find Macman
    • Press Macman
    • Press Modify [top right of the screen]
    • Press Remove (you could reinstall if you were having issues with the application, like it wouldn’t start)
    • Press Confirm to begin removing the app
    • Once you see Complete, press home and the Macman icon should be gone

    6. Searching for Applications

    One of my favorite features of Cydia is Searching.

    I can find an app without having to go through countless categories because I can’t remember where it was located:

    • Press Search
    • Type part of the application name or description in the search box at top

    The list is filtered as you type, and all matching applications are shown. Select one to install and follow step 4 above.

    Remember a lot of applications you might have seen in Installer.app previously are not yet available because the developers haven’t updated them to work on the new 2.0 software.

    Check the Changes section in Cydia daily for updates. Three new applications have shown up just in the time it has taken me to write this tutorial!

    A few of my favorite apps already available on Cydia:

    MiM (Make it Mine) by Erica Sadun
    MiM lets you customize the carrier name on the top left of the phone. You’ll notice in the screenshots above mine has my screenname “w1kedZ.”

    NES
    NES is a fully functional Nintendo emulator. It loads ROM files that can be found in various places on the internet. It’s great for showing off or if you really love games like Super Mario Bros. and Legend of Zelda.

    BossPrefs
    BossPrefs is a great app by BigBoss that lets you easily turn on and off different features of the iPhone. Currently, the version for the 2.0 software is only really useful for turning on and off SSH if you have installed the OpenSSH package from Cydia. It also contains Poof which will allow you to hide/show icons on the homescreen; a useful feature if you are like me and don’t want the original Stocks Icon on your Springboard because you never use it.