Thursday, August 28, 2008

Upgrade Your iPod's Drive and Firmware for FLAC Playback

Upgrade Your iPod's Drive and Firmware for FLAC Playback

ipoddrive_20070407.jpg
Rockbox is an alternative (open source) firmware that will run on many iPods. One of its cooler features is that it supports several audio codecs such as OGG, AC3 and everyone's favorite lossless codec, FLAC.

What's also interesting about Rockbox--and this is slightly less talked about--is that it handles gapless playback really nicely. Instead of pausing or fading between songs, Rockbox will start the next song immediately after the previous one ended. This is great for playing back audio taken from electronica and live/concert CDs that blend one track straight into the next.

My friend Justin went about upgrading his 4th gen iPod to use Rockbox the other day and he ended up upgrading his iPod's hard disk and battery as well, in order to accommodate playback for all the larger FLAC files he's been encoding. Thankfully, he put together a nice little howto which documents the whole process, including the tinfoiling of his new drive (above photo), which eliminated an EMI issue that he encountered with the new disk.

Resources:

How to convert .flac files to .mp3 using OS X

How to convert .flac files to .mp3 using OS X

by Ross McKillop on July 15, 2006

Mac iPod/iPhone

You’ve downloaded a show or two from http://bt.etree.org and now you want to convert the .flac files to .mp3 to take with you on your iPod or MP3 player. This tutorial will walk you through the steps to do just that, using OS X. Read on ..

First things first, make sure you’ve downloaded and installed xACT and iTunes, both of which are free.

There are two steps in converting your .flac files to .mp3. The first is to decode the .flac’s into .wav files. After that’s done, you’ll encode the .wav files into .mp3’s.

Decoding .flac files with xACT
Encoding .wav files with iTunes

Decoding .flac files with xACT

  1. Launch xACT and select the decode tab
  2. Click the add button
  3. Navigate to the .flac files you want to decode, select them all, and then click Add files

  4. Click to enlarge

  5. Now you’ll need to select the output - I use and suggest .wav. Click Decode when you’re ready

  6. Click to enlarge

  7. You’ll be prompted to choose a location to save the output files. Select the same folder where the .flac files are located and then click Choose

  8. Click to enlarge

  9. Go put on a pot of coffee. The decoding process only takes a few minutes.
  10. When it’s completed you’ll be back at the decode screen but there won’t be any files in the decode list. Feel free to close xACT now.

Encoding .wav files with iTunes

  1. Open up iTunes and select iTunes from the top menu, and then Preferences… from the drop-down list
  2. Select the Advanced tab from the top menu, and then Importing from the lower menu

  3. Click to enlarge

  4. From the Import Using: list, select MP3 Encoder
  5. From the Setting: list, select your quality preference. I happen to have a lot of space on my portable MP3 player, so I opt for Higher Quality (192 kbps)
  6. It also annoys me to have songs playing while they’re importing, so I disable that feature by removing the check from the box labeled Play songs while importing. This is entirely optional. Click OK to return to iTunes.
  7. Now select File from the top menu, and then Add to Library… from the drop-down list
  8. Navigate to the folder where you saved all of the .wav files from xACT, select that folder, and then click Choose

  9. Click to enlarge

  10. iTunes will now import all of the .wav’s into iTunes. Find all of the newly added files (usually at the bottom of your iTunes list, but it depends on how you sort your music) and select them all. Once they’re all highlighted, right-click (ctrl-click for you one-button folks) on any of the selected songs and choose Convert Selection to MP3 from the pop-up menu.
  11. Remember that pot of coffee you put on while the .flac files were decoding? Now’s the time to get a cup. While iTunes is encoding your MP3s, a status indicator will appear in the left window (see image below). Depending on how “fast” your mac is (processor speed, memory etc) and how many files you’re encoding, this step can take anywhere from a few minutes to an hour.
  12. Once all of the files have been encoded, iTunes will probably beep to get your attention. Before you start listening to your music, now’s a good time to get rid of the .wav files, since they’re no longer needed. You should notice that ever other track in iTunes is highlighted. These are the .wav files - get them out of iTunes by clicking the delete key on your keyboard. If iTunes asks if you want to delete the files as well as remove them from iTunes, feel free to do so (you should still have the source .flac files if you ever need an uncompressed version again)
  13. That’s it! You’re done. You can now tag the files in iTunes, transfer them to your iPod etc. If you need to get at the MP3s, they will likely be located in Mac Hard Drive:Users:you:Music:iTunes:iTunes Music:

iPod hacking

installing another OS in iPod
http://www.rockbox.org
http://www.rockbox.org/twiki/bin/view/Main/IpodPatcher

Fluke - Play FLAC files in iTunes

Fluke - Play FLAC files in iTunes

http://cubicfruit.com/fluke/

How It Works

  1. Download and install Fluke.
    Follow the installer steps and punch in your admin password when asked for it.
  2. Restart iTunes.
    If you've got iTunes or QuickTime running, restart them.
  3. Listen to your FLACs!
    Right-click/Ctrl+click on the FLAC files you want to add to iTunes and choose Open With > Other. Locate Fluke under your Applications and press OK. Or simply drag your FLACs onto Fluke's application icon.
  4. Set as default.
    If you would like to use Fluke for all your FLACs by default, in the Open With dialogue mark the "Always Open With" checkbox

Fluke Logo

Fluke, a Mac approach to listening to FLACs. Download, install and use. No moving files around, dragging libraries or following stupid instructions by someone who thinks he’s funny.

I’ve written out a pretty clear how-to on Fluke’s main page, but to sum it all up, all you really have to do is download and install the thing, and open your FLACs with it. Or just drag them onto Fluke’s icon.

Let me know how you like it, and make sure to leave a comment if it acts up. Not too complicated a program to act up but it is my first effort.

FLAC fix for MAC : xiph.org/quicktime/

http://xiph.org/quicktime/download.html

XiphQT logo

QuickTime Components

navigate :

* news
* about
* downloads
* FAQ
* report problems
* for developers
* contact

Downloads.

The current version is 0.1.8. It is expected to work with the following system configurations:

* Mac OS X (PowerPC and Intel):
o version 10.3.9 or 10.4 and later;
o QuickTime for Mac OS X - version 7 or later;

The latest version of XiphQT for Windows is 0.1.5 and it requires:

* QuickTime for Windows - version 7 or later.

For more details on features and changes see release notes.

Additional information on some minor installation issues that may happen can be found in the XiphQT FAQ.
Xiph QuickTime Components binary packages
Download link Size MD5 checksum
XiphQT 0.1.8 (Mac OS X) 1.0MB d6ea6ad82d5cf6a90bcad0cb49d99f4d
XiphQT 0.1.8 (Mac OS X, only decoders) 602kB 4d572d07d5db535938392e6bc1473360
XiphQT 0.1.5 (Windows) 229kB 697eb065a3e8f5b8f5b3cf5be2afa33f

Tuesday, August 19, 2008

Mac OS X 10.4: Keychain Access asks for keychain "login" after changing login password

Summary

In Mac OS X 10.4 Tiger, if you change your account's password using your Mac OS X Tiger Install disc (or if your network-based account password is changed due to a network admin forcing a password change), your default keychain password (which uses the same initial password as your user account) does not change. Because of this, you will be prompted to enter a keychain password each time an application requires authentication that your keychain would normally provide.

Products Affected

Mac OS X 10.4

Note: This doesn't happen if you change your account password using Accounts preferences.

If you want your default keychain to be unlocked automatically when you log in, synchronize your Keychain Access and account login passwords by doing this:

  1. Open Keychain Access (you can get to it by choosing Utilities from the Go menu in the Finder).
  2. From the Edit menu, choose Change Password for Keychain "login."
  3. Type the former password of the account that you are currently logged in to, then click OK.
  4. If you entered the correct password, a new window appears; enter the original password again in the Current Password field.
  5. In the New Password field, type the password that matches your current account password.
  6. Re-enter the newer password in the Verify field, then click OK.

I don't remember my original (former) account password

If this is the case, you'll have to delete the keychain.

  1. In Keychain Access, choose Keychain List from the Edit menu.
  2. Delete the "login" keychain.

The next time you log in to the account, you can save your current password in a keychain.

Reset a Lost OS X Account Password

Over the past few weeks, lots of people have been contacting Mac OS X Tips asking how to reset a forgotten Mac OS X user account password. Depending on the circumstances, this task could take 5 minutes or could even be completely impossible. Here is a run through of the different ways you can reset an account password depending on the type of account, whether FileVault is enabled and whether you have the Mac OS X Install Disc.
If you still know the Administrator Password
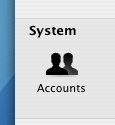
If you still know the password to an administrator account, it is very simple to reset any standard or managed user's password. While logged in as the administrator, open up System Preferences and click on the Accounts section. All the accounts on the computer should be listed down the left hand side. Under each account name it should say Admin, Standard or Managed. If the lock at the bottom of the window appears locked, click on it to allow changes to the preferences.

Accounts
The next step is to select the user whose password you want to change and click on the Reset Password button. Enter the new password and click Reset Password. If you have created multiple Administrator accounts, you can use this method to reset their passwords too, as long as you know the password for the original administrator account.


Resetting an Administrator Password
Obviously, if you don't have access to an administrator account, you can't carry out any of the above steps. If you have forgotten the Administrator password or you can't log into your Mac at all, you will need to use the Mac OS X Install Disc.

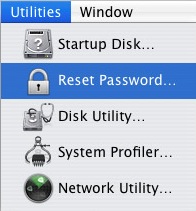
Enter the Mac OS X Install Disc that is the closest version to that running on the Mac. For example, if you are running Mac OS X 10.4 Tiger, you should enter the Tiger install disk, not any earlier ones. Restart the computer, and hold the C key as it starts up. This might take longer than usual, and you can release the C key as soon as the Apple logo appears on the screen. When the window appears, choose your language and click the right arrow.
Reset Password

The next step depends on what version of Mac OS X you are using. For Tiger (10.4), choose Reset Password from the Utilities menu. For earlier versions, choose Reset Password from the Installer menu.

Choose your Hard Drive from the top and then choose the Account from the drop down menu. Be careful not to select System Administrator, as this is actually the root user, not the administrator account on your Mac. Now enter the new password, click Save, quit the Installer and restart the computer.

Note that there are a few issues with this method. Firstly, it does not reset your keychain password. You will have to do this separately. Secondly, do not attempt this if you have FileVault enabled. To reset an FileVault protected account, you need the master password.

Resetting a FIleVault Protected User's Password
If you have enabled FileVault to encrypt your Account, you need to know the master password that you set when you enabled it. This is the password that the administrator should know that allows you to reset any password on the computer. If you have forgotten the master password, unfortunately your data is lost forever.

If you know the master password, start by attempting to log into your account. When you get the password wrong three times, you will be able to click "Forgot Password". Now you will have to enter the master password and then a new login password for your account.

If you have lost the Mac OS X install Disc
If you have lost the install disc, don't try and use one from an earlier version as this might permanently block you out of your account. You really have two options: Firstly, you could buy a new copy of Mac OS X (try eBay). Secondly, there is a way of resetting an administrator password without the disc if you are running Mac OS X 10.4 Tiger. Note: Do NOT do this with a FileVault protected account, or your data will be lost forever.
First, note the short name of the account. This is the same as the name of its home folder, but not necessarily the name that appears in the login window. Restart your computer, and while it is starting up, hold Command-S. This will start up your Mac in Single User Mode. Once it has started up, you will need to enter three lines of code. Enter sh /etc/rc and press return. Then enter passwd yourusername and hit return. Now you will have to enter a new password twice. What you type won't appear on screen, but it is working. Once you have done this, type reboot and hit return.

This is the same as the Install Disc method in that it doesn't reset your Keychain password.
For That follow this

How to Install Software from DMG Files on a Mac

One of the most common mistakes I see among new Mac users is fumbling with how to install new software. The process for installing new applications on your Mac can be confusing at first because it differs greatly from Windows’ software installation process. Nevertheless, the Mac method of software installation is actually quite simple and intuitive once you are accustomed to it. If your desktop is littered with DMG files and white drive-looking icons, read on!

Software installation with Mac OS X is very different different than the Windows world. On a Windows PC, you run an installer, tick off a few check boxes, and wait for the progress meter to reach completion. On a Mac, you simply drag and drop an Application into your computer’s “Applications” directory. The trick is that most Mac applications are distributed in DMG files, and many new Mac users end up running applications out of those DMG files instead of copying the applications to their Mac’s “Applications” directory.

Enough explanation, here’s how to install most Mac OS X applications:

  1. Download the app’s .DMG file. Often times it will end up on your desktop.
  2. Double-click the .DMG file to open it up. Another new icon with a name similar to the .DMG file will appear on your desktop.
  3. If a new Finder window doesn’t automatically appear, double click on the new icon that has appeared on your desktop. Guess what? A Finder window will appear.
  4. Locate your application’s icon within this new Finder window. Drag and drop it into your “Applications” directory.

Further Explanation

Alright, that was the abridged version. Here’s the long-winded version. I have just downloaded the DeskLickr application, and DeskLickr_1.2.dmg is sitting on my desktop. I double-click on DeskLickr1.2.dmg and a new icon labeled “DeskLickr 1.2″ appears on my desktop. Here’s what my desktop looks like at this point:

A dmg file mounted and displayed on the desktop

Fig. 1 - A DMG disk image mounted and ready.

Since most DMG images also pop up a new Finder window when they’re ready for use, the following window has also appear on my desktop:

An application Finder window

Fig. 2 - The Finder window that appears after I double-click on the .DMG file.

Different applications are going to show you slightly different Finder windows. Each application’s designers like to add their own artwork. Glitter aside, most applications are also trying to tell you the same thing. See the arrow pointing from the DeskLickr icon to the Applications folder? That arrow is telling me to drag the DeskLickr icon and drop it into the Applications folder. Once I’ve done so my application, in this case DeskLickr, is installed.

If an application does not provide a shortcut to the Applications folder in which to drop the application icon, you’ll need to pop open a new Finder window. Press CMD+N to open a new window, then drag the application icon over to the “Applications” folder in the left-hand sidebar of the new window. Here is an illustration:

Manually opening a new Finder window in order to install software

Fig. 3 - Dragging the application into the “Applications” folder of a new Finder window.

House Cleaning

Once your new application is installed, it’s time to do some house cleaning. You no longer need the disk image you downloaded, so perform the following tasks:

  1. Close any Finder windows that have been left open.
  2. Eject the disk image (not the .dmg file). Click on it’s desktop icon, then press CMD+E.
  3. Delete the .dmg file by dragging it to the trash.

That’s it! Your new Mac application is installed and ready for use. But wait…

Bonus Tip: Add Your New Application to the Dock

I knew you were going to ask, so I figured I would cut you off at the pass. In order to add your new application to the Dock, follow these steps:

  1. Open up a new Finder window.
  2. Click on Applications.
  3. Locate your application’s icon.
  4. Drag the icon to your Dock, and drop it wherever you like.

What Are .DMG Files?

A DMG file icon

DMG stands for disk image, and is a format commonly used to distribute files and applications among Apple computers. A DMG file is like a virtual DVD or hard drive. DMG files can be “mounted” on your Mac in order to work with their contents, or even burned to an actual physical disk.

A dmg file mounted to Mac OS X

Fig. 1 - A disk image mounted as a virtual drive.

In order to understand the concept of a DMG disk image, think of a storage volume such as a CD, DVD, hard drive, or external hard drive. A DMG file is like one of these devices in that it serves as a means to encapsulate documents, images, software, and other files. The difference between a DMG file and one of those devices is that with a DMG, there is no physical storage medium. There is only the DMG file, which can be written to a hard drive, burned to a CD or DVD, or sent over the Internet.

In order to work with the contents of a DMG file, you must mount the disk image to your system. This may sound daunting, however “mounting” a DMG file with Mac OS X is no more complicated than double-clicking it’s icon. The operating system will load the disk image and place a new drive icon on your desktop. You’ll also see that icon appear in the upper left-hand sidebar of the Finder. The icon will have the same name as the DMG file, and you will be able to explore it’s contents with the Finder.

Unmounting a DMG from the Finder

Once you are done working with the contents of a DMG file, you will want to remove or “unmount” it from your system. Do this by opening the Finder and clicking the eject icon shown next to the virtual drive’s icon. You can also do this by going to your desktop, clicking once on it’s icon, and pressing CMD+E.

Import and export images to and from Photo Booth

Apps
If you have kids and a Photo Booth-equipped Mac, you've probably got hundreds of photos in Photo Booh, with no easy way to navigate them. You can move them all into iPhoto and manage them there, and then delete them from Photo Booth. You can also move photos into Photo Booth, though that's a bit trickier.

Exporting and removing images from Photo Booth
  1. Click on one photo in Photo Booth and hit command-R to reveal the file in the Finder. In the Finder window, hit Command-A to select all, then hold down the command key while clicking with the mouse to deselect any pictures you don't want to move and delete.
  2. Open iPhoto and create a new album to hold the pictures you're moving over. Go back into the Finder and drag all the selected photos over into iPhoto. After the file transfer is done, click back over to the Finder (but don't click into the Finder window or your selection will disappear). Hit Command-Delete to move the selected files to the Trash.
Importing images into Photo Booth

But what if you want to import a photo into Photo Booth -- perhaps one you moved out earlier? Here it gets a bit trickier, as you need to mess with the Recents.plist file that sits in the Photo Booth folder and serves as a directory. Read on for the how-to...

  1. Move any photos that you want to add to Photo Booth into the folder where it keeps its images. (Again, to find the right folder, use Command-R on any of the photos in Photo Booth.)
  2. Make a backup copy of recents.plist by selecting it and typing Command-D.
  3. Quit Photo Booth and drag the original recents.plist into a text editing program like TextEdit. You'll see an XML file with fairly simple syntax:


    Photo 1.jpg
    Photo 2.jpg


    To make any new photos show up in Photo Booth, all you have to do is edit this list, adding new entries to the list with the correct file name and the correct syntax.
But what if you've made a lot of changes to the files in the folder? Rather than typing in names manually, you may want to generate a fresh list of the files currently in the folder.
  1. Open terminal. Type cd, then press the Space Bar. Now in Finder, drag the folder you're working with into the Terminal window. Mouse click on Terminal to make it active and hit Return. Then type ls -1 (that's lower-case l, s, and the number 1, meaning "list short with one entry per line"). Hit Return again. You should get a list of all the files currently in the folder.
  2. You'll have to massage the list a bit (I usually employ Microsoft Word for find and replace work) to translate it into the proper format. Open Word and paste in the data from Terminal. Delete Recents.plist from the end of the list (since the finished plist doesn't need to include itself in the list of photos).
  3. Hit Command-F, then click on the Replace tab. Enter ^p in the search field (that's the code for paragraph breaks) and enter ^p^t in the replace field. Click on Replace All.
  4. Add a to the first item in the list, and delete any unneeded extra stuff at the end of the list.
  5. Select the results and hit Command-C to copy.
  6. Switch to the recents.plist file that you've opened in TextEdit, select all the lines, delete, and paste in the new lines from Word.
  7. Save the new recents.plist file to disk and reopen Photo Booth. All the pictures in the folder should now display.

Quickly and Easily Put Your Mac’s Monitor to Sleep

I have a Mac in my bedroom, and sometimes I use it right before I go to sleep. When I lay down, I usually don’t fall asleep until the monitor goes to sleep, stopping my screen saver from flashing. Is there a quick way to put my Apple monitor to sleep right away, without shutting off the computer?

It doesn’t sound like there is much worse than laying in bed while your screen saver illuminates the walls and ceiling with all sorts of colors. You could pull the covers over your head… or you could use Exposé hot corners to put your monitor to sleep!

Exposé is a feature of Mac OS X that allows you to control your desktop with ease. Exposé has all sorts of neat tricks built in, like auto-arranging open windows and clearing everything away to show the desktop. The Exposé feature you are going to use in order to quickly put your display to sleep is Active Screen Corners.

Active Screen Corners allow you to assign a different action to each corner of your display. For instance, you can tell Exposé to start your screen saver when you touch the top right corner with the mouse, or show all windows when you touch the bottom left corner. One of the actions you can assign to a screen corner happens to be Sleep Display.

Step 1: Go to System Preferences

Go to your System Preferences by clicking its dock icon, or clicking the Apple symbol (top left corner), then System Preferences. When the System Preferences window appears, click on “Exposé” (”Exposé & Spaces” for Leopard users).

Step 2: Configure Active Screen Corners

Under Active Screen Corners, you will see a drop-down menu next to each corner of your desktop. Decide which corner you would like to touch with the mouse in order to put your display to sleep, then select “Sleep Display” from that drop-down menu. Here is a screen shot:

The Expose configuration screen

Once you have made this selection, everything is set. You can close the System Preferences window, and touch the corner of your screen to which you assigned “Sleep Display” in order to turn off your monitor. Sleep well!

IE : Internet Explorer, lover ?? Use IE on MAC

ies4osx icon


Web Developers who use a Mac, as well as the just-plain-curious, will be happy to know that they can install multiple versions of Microsoft Internet Explorer on their Apple computers without springing for Parallels. Open source utility ies4osx gets the job done with a surprisingly minimal amount of effort.

While it is novel, ies4osx appears to be not much more than a cool toy. I installed all four versions of IE that were offered, and they all ran extremely slow. I tested the software on a Mac Pro, which should not have trouble running any sort of application, especially not a few aged Web browsers.

installation screen of ies4osx

Running ies4osx will be useful for testing the occasional site, but it is not very practical for heavy use. I suppose that doesn’t really matter though — who would really want to use IE on a Mac anyway?

How Does Time Machine Work?

Time Machine logo
Time Machine is the backup feature of Apple’s Mac OS X 10.5 operating system. So what is Time Machine, and what exactly does it do with your data?

Time Machine safeguards your data using a process called incremental backups. In a regular backup, a copy of your data is made. If you experience data loss, you go and fetch the backup copy. In an incremental backup, many different copies of your data are made by Time Machine automatically.

Each time that Time Machine performs a backup, instead of overwriting the last backup, it saves all of the changes that have been made to your data since the last backup. When the backup drive has been filled, Time Machine removes the oldest backup to make room for the newest.

Benefits of Incremental Backups

The fact that many revisions of your data is kept forms the basis for the name “Time Machine”. Since you have a copy of each successive version of your data going back to a certain point, you have the option of “going back in time”. By doing so, you can restore a document the state it was in at a certain date and time. Accidentally deleted important information from a report? Restore the backup from a few hours ago. Hard drive crashed overnight? Buy a new one and restore the backup from a day earlier.

How to Use Time Machine

In true Apple fashion, Time Machine is very simple to use. All you need to do is purchase an external hard drive and plug it into your Mac. Leopard will ask if you wish to use the new drive for Time Machine. Answer “yes”, and you have just dove into the world of incremental backups.

The larger the capacity of your external drive, the more incremental backups Time Machine can store. I would suggest getting an external drive whose capacity is at least equal to that of your Mac’s internal hard drive.

What is a Universal Binary?

What does it mean when an Apple site asks me to download a Universal Binary?

Universal Binary logo

Every computer has a certain brand of processor, and computer programs are built with these specific processors in mind. Up until 2005, Apple used Motorola PowerPC processors in their computers. At a developer’s conference in 2005, Steve Jobs announced that era would be coming to an end as Apple moved their architecture to one that made use of Intel processors.

Despite that new Apple computers come loaded with Intel hardware, there are still plenty of people using older machines with the PowerPC architecture. To cater to these customers, Apple makes use of Universal Binaries in distributing applications. Universal Binaries contain the code necessary to run on both Intel and PowerPC processors. By distributing Universal Binaries, Apple avoids the confusion that would undoubtedly arise from distributing two versions of an application and requiring each customer to choose the correct one.

Reset your Mac OS X password

You can reset your password with the CD (or DVD) that came with your Mac,. Restart your machine while holding down the Command Key (or "Apple Key") and the "S" key. This will start your Mac up in "Single User Mode."

Now it's command line time.** Don't worry, it's just three lines:

* #sh /etc/rc
* #passwd yourusername
* #reboot

Ta-dah! You may return to what you were originally doing. Just write that new password down first.

Monday, August 11, 2008

BootXChanger [ Boot Image Changer ]

BootXChanger


BootXChanger will allow you to change the boot image (the gray Apple) on Mac OS X 10.4 and 10.5
This screenshot will explain how to use it:

System Requirements

  • A PowerPC or Intel-based Macintosh
  • Mac OS X 10.4 or newer
Check the Website
http://www.namedfork.net/bootxchanger/

Forum for mac

Here is the forum for mac community
that is :
www.mac-bb.com

Regiaster And Enjoy

Monday, August 4, 2008

NTFS, this is the one thing, Mac lacking ...

Hey, I have NTFS formatted USB Drive, O great cool i am reading from it,
playing songs, but I dont like a song, go ahead delete it, got you.. you can't..
it is kind of oneway, all NTFS disks are read only in the Mac ( as far as right know my knowledge concern )
Even one hand half week, I was using my windows XP Virtual Machine to delete the data from the NTFS formatted partition..
But now no need to struggle... like me here is the one we needed

http://www.paragon-software.com/home/ntfs-mac/

NTFS for Mac® OS X


  • Paragon NTFS for Mac® OS X beats down the barriers between Windows and Mac® OS!
  • Effectively solves the communication problems between the Mac® system and NTFS. Providing full read&write access to Windows NTFS partitions under Mac® OS X.
  • Excellent solution for end users, SOHO and the Enterprise
See my MacApp folder on esnips.com
MacApp

Saturday, August 2, 2008

You dont know when you need power of other OS..

You will never know when sudden, you need the other os i mean to say PC, or being more specific :(, windows.
I was looking for the software, which can transfer songs from ipod to Mac, found 2 utils, one is "Kandalu X" ( http://www.kandalu.net/MacSoftwares/overview.php ) and other 4media Trasfer ipod to mac/pc (http://www.mp4converter.net/)
I just install Kandalu X, but at the first run it told me that my trial is expired. :(
then I went for 4Media's ipod to mac, it is quitting unexpectedly.
So Downloaded the PC version, and transferring the songs to windows(running on VMware on my Mac), then i will just do simple drag and drop to my Mac ;D heheheheheee...
SO keep everything ready all the time you don't know, when you will be in need of what ...
have a Good luck happy podding ....